Kaboo Color Reduction Tool - Help / ヘルプ

1. Introduction / はじめに

This tool allows you to reduce the colors of an image using various algorithms and a custom palette. It is designed for pixel art creation and retro-style graphics.

2. Loading Source Image / 元画像の読み込み

Load Source Image: Click this button to select the image you want to process (PNG or JPG). The image will be displayed in the main area. You can zoom in or out using the zoom slider or the mouse wheel.
Convert to Pixel Art: This button is located immediately to the right of Load Source Image. It is intended for AI-generated or enlarged illustrations that look like pixel art but do not yet use a consistent one-pixel grid. The converter estimates the underlying pseudo-pixel cell size and reconstructs the image as a smaller, true pixel grid. It automatically works to preserve small structures, two-color details, rectangular frames, isolated silhouettes, and long horizontal or vertical seams.

This conversion is independent of Pseudo Dot Width and does not use the Smart, Center, or Avg downsampling modes. Load an image first, then click Convert to Pixel Art. The button temporarily changes to Converting... while processing, and the converted image is then displayed in the normal source-image view.
Options (Convert to Pixel Art): Click Options next to the conversion button to open a small floating settings window. Opening it does not push the rest of the interface downward.
  • Palette Colors (default: 48): Sets the maximum number of colors used in the converted image.
  • Detail Preservation (default: 0.60): Controls how strongly local edges and details influence cell reconstruction.
  • Structure Protection (default: 0.90): Preserves central strokes, endpoints, tiny holes, and other small structural features.
  • Binary Region Protection (default: 0.88): Detects regions that are likely meant to use only two colors and prevents unwanted intermediate colors from appearing.
  • Rectilinear Protection (default: 0.88): Straightens detected rectangular frames and other strongly supported right-angled structures.
  • Silhouette Edge Protection (default: 0.88): Cleans antialiased or frayed edges on isolated objects, such as floating platforms.
  • Axis Seam Protection (default: 0.82): Stabilizes long horizontal and vertical boundaries, such as the border between a HUD panel and the game background.
  • Reset: Restores all Convert to Pixel Art settings in this window to the default values listed above. It does not immediately start a conversion.
The information line at the bottom of the window shows the estimated cell size, output size, mesh statistics, and the number of protected structures detected during the most recent conversion.
Pseudo Dot Width: Use this when you already know the source image's pseudo-pixel width and want to downsample it manually. Select a value from 1 to 16. A value of 1 leaves the size unchanged; other values reduce the image to approximately 1/the selected value of its original width and height. Smart analyzes each block and attempts to preserve important colors and structures, Center uses the center pixel of each block, and Avg uses the average color of the block.
Highlight Recovery (Smart only): Click Highlight Recovery to open its settings in a small floating window. Enable Recover Small Highlights to preserve tiny bright details that would otherwise disappear during strong Smart downsampling, such as eye highlights, gem reflections, blade glints, and reflections on bottles. Highlight Recovery does not change the palette selected by Smart. Instead, it detects important bright micro-features in the source image and may relocate them by a small number of output pixels so they remain visible in the reduced image.
  • Min Contrast: Sets the minimum brightness difference between a highlight and its surroundings. Increase it to ignore weak light variations; decrease it to recover subtler highlights.
  • Min Brightness: Sets the minimum absolute brightness of a recoverable feature. Increase it to keep only white or near-white highlights; decrease it to include colored bright details.
  • Recovery Strength: Controls how strongly a detected highlight may override the normal Smart result.
  • Max Move: Sets the maximum distance, in output pixels, that a highlight may be relocated to avoid replacing an important base pixel.
  • Max Feature Size: Sets the largest source feature, relative to one output cell, that may be treated as a small highlight. Increase it when eye highlights are larger than the current limit.
  • Max Recoveries: Sets the maximum number of highlights that may be restored in one image.
While dragging a slider, only the displayed value changes. The image is processed after you release the slider. Click Reset to restore all Highlight Recovery sliders to their default values; the color count and the Recover Small Highlights checkbox are not changed. Very permissive settings may restore unwanted bright dots, so compare the result with Highlight Recovery turned off while tuning the parameters.

3. Palette Management / パレット管理

Set Palette Image: Click this button to load a palette image (PNG or JPG). Unique colors will be extracted from the image (up to 1025 colors). You can create this image yourself or obtain it from sources like LOSPEC.
Palette image sample
Enable Color Deletion:To remove individual colors from the palette, check this checkbox. You can delete colors by clicking on the color chip.
Save the current palette: You can save the current palette as a palette image.
Default Palette: We perform color reduction using RGB232, RGB322, RGB343, and RGB433 palettes.

4. Pre-color reduction processing / 減色前処理

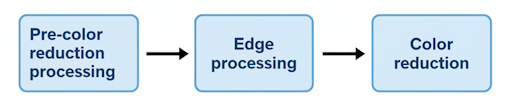
Enable Pre-processing: Check this to apply color adjustments (RGB, Brightness, Contrast, etc.) to the source image before color reduction. This helps in tweaking the image to better fit the palette.
Pre-color reduction processing, Edge processing, Color reduction

5. Algorithm Type / アルゴリズムタイプ

Select the method used to map image colors to the palette:
  • Nearest Neighbor: Simple Euclidean distance matching. Fast but can be noisy.
  • Luma Weighted: Matches colors based on perceived brightness (Luma). Good for grayscale or preserving lightness.
  • Perceptual (CIELAB): Matches colors in the CIELAB color space. Closest to human vision.
  • Weighted (HSV): Allows you to customize the importance of Hue, Saturation, and Value.

6. Edge processing / エッジ処理

Apply effects to edges detected in the image to enhance outlines or add details.
Force Edge (Alpha): Forces pixels with opacity within the specified range to be treated as edges.
Outline Detection: Detect outlines. For pixels with an opacity greater than or equal to Opacity Thr, they are treated as an outline if there are adjacent pixels with an opacity less than or equal to Alpha Thr.
Edge Algorithm: Select the edge detection algorithm (Sobel, Prewitt, Roberts, Laplacian). You can adjust the threshold. In addition, you can adjust the slider to prioritize "brightness" or "hue" in Hue Prio.
Edge Adjustments: Specify the processing content for dots identified as edges.

7. Comparison & Saving / 比較と保存

Add to Comparison: The image will be processed and added to the grid. Click on the resulting image for a detailed view or to save it. You can also see which dots were treated as edges.

8. Disclaimer / 免責事項

This software is provided "as is", without warranty of any kind. The author is not liable for any damages arising from its use.
Note: This help page was written by Antigravity doing their best, so please forgive any small mistakes.